Micro French with Pastel Tips: The Modern Take on a Classic Manicure
A whisper-thin colored tip, drawn in soft lilac, mint, or peach, that keeps the French silhouette but adds a fresh modern personality.

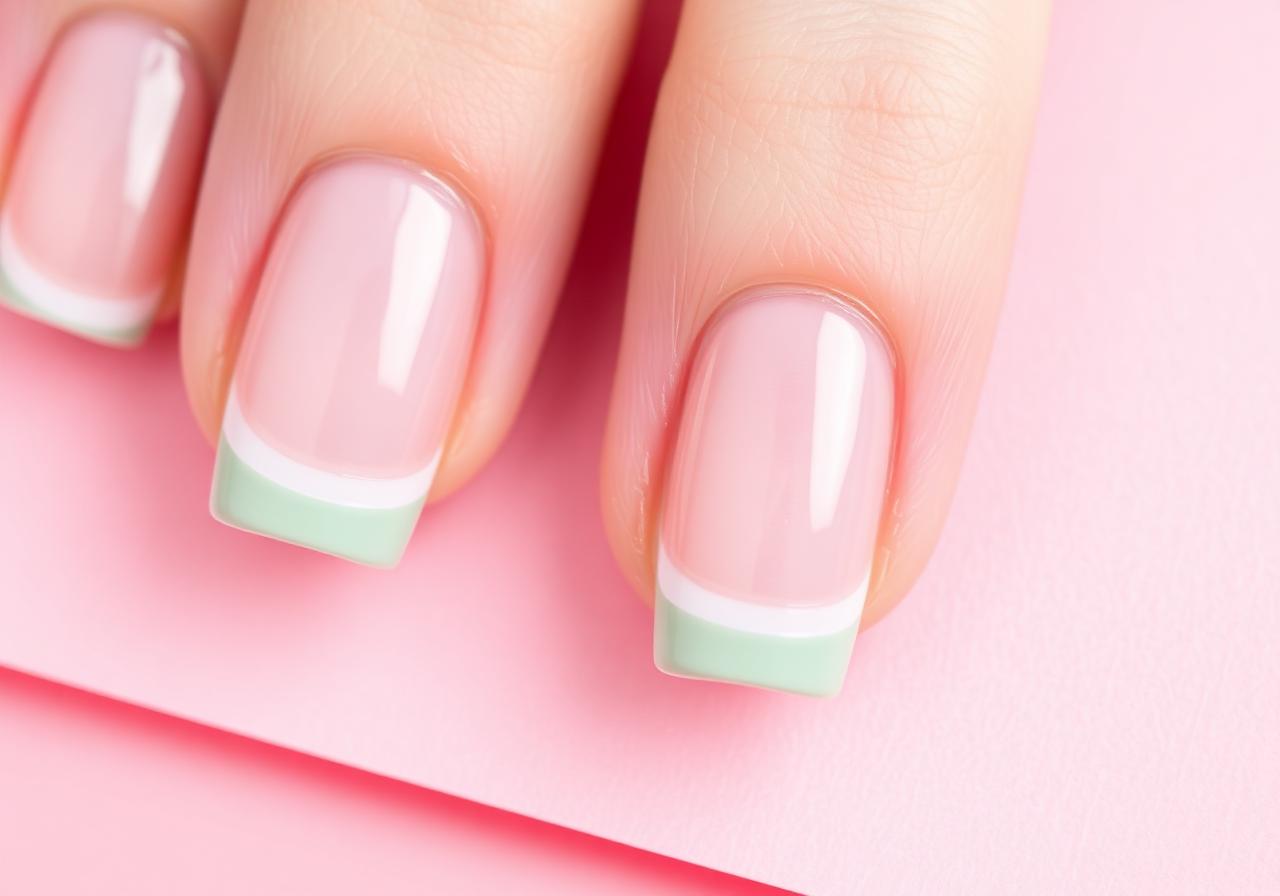
There is a specific corner of the internet obsessed with a very particular manicure right now: nails that look almost bare, with just the thinnest possible line of color tracing the free edge in an unexpected pastel. Lavender. Sage. Butter yellow. Milky peach. It is a French tip that has been on a walk, changed clothes twice, and come back looking like something you would see in a Parisian art gallery. This is the micro French, and it is officially the update the classic manicure needed. What makes it work is the discipline of the line itself. A traditional French tip lets the color take a bold, quarter-inch stripe of real estate. A micro French uses roughly one-third the width — barely two millimeters — which reads as clean and architectural rather than showy. Because the line is so thin, you can push the color palette anywhere without it feeling loud. A neon coral micro tip is still tasteful. A butter yellow micro tip is honestly gorgeous. The rule flips: on a big French tip, color choice is everything; on a micro French, color choice is fun. This tutorial covers a three-nail palette — a soft lavender on eight nails with a mint accent finger and a peach accent finger — plus everything you need to know to draw the line freehand, which is genuinely easier than it looks once you understand the brush angle.
Why pastels work best for the micro line
Pastels have a specific quality that makes them ideal for the micro French format: they carry color without carrying weight. A saturated red micro tip photographs almost like a wound at the edge of the nail — the eye reads it as damage, not decoration. A saturated black micro tip looks like a mistake. Pastels sit at the volume level the format was designed for. That said, the micro French is not exclusively pastel — a fine metallic gold line is stunning for evening, and a chocolate brown micro tip is a beautiful autumn look. But for a first attempt, and for the most reliably flattering everyday version, stick to soft pastels in the sage/lavender/peach/butter family.
The multi-color trick that makes it look expensive
Painting all ten nails with the same tip color is fine. Painting eight nails one color and the two accent fingers (ring finger of each hand) in complementary shades is what turns the manicure into a statement. The eye reads the variation as intentional and considered — the way a stylist mixes prints. For a fool-proof combination, use a warm base pastel on the eight and place a cool contrast on the two ring fingers, or vice versa. Lavender everywhere, mint on the ring fingers. Peach everywhere, sage on the ring fingers. Butter yellow everywhere, lilac on the ring fingers. All three combinations photograph beautifully.
Two paths: freehand or French-tip guides
You have two options for drawing the line. Path one is freehand, using a fine-tipped brush. This gives the most organic result and is faster once you have practiced twice. Path two uses French-tip vinyl guides — small sticker curves you press onto the nail as a stencil. Guides are more forgiving and give a crisper edge, but they can lift color if your base is not fully dry. This tutorial teaches the freehand method because it is a genuinely useful skill that transfers to a dozen other nail art techniques.
What You'll Need
- ✓Sheer milky base polish (or leave the nail bare with only a clear base)
- ✓Soft lavender pastel polish (main color)
- ✓Soft mint pastel polish (accent color one)
- ✓Soft peach pastel polish (accent color two)
- ✓Ultra-fine liner brush (size 0 or 00, from any nail art aisle)
- ✓Small palette or piece of foil for offloading the brush
- ✓Pure acetone for cleanup
- ✓Fine detail cleanup brush
- ✓Fast-dry glossy top coat
Step-by-Step
- 01
Choose the shape that flatters a micro line
Micro French looks best on shapes with a clean, defined edge — square, squoval, or a very soft almond. Round tips can work but tend to make the line look uneven because the eye has no straight reference. File all ten nails so they match. Even for a design as subtle as this one, shape symmetry is what makes the finish read intentional.
- 02
Prep and hydrate
Push back cuticles, buff the surface lightly, and wipe every nail with dehydrator or rubbing alcohol. Massage cuticle oil into the surrounding skin, then wipe any oil off the nail plate itself. Hydrated skin makes the whole hand photograph better. Skipping prep is still the number one reason DIY manicures fail early.
- 03
Apply base coat and the sheer base
Start with one thin coat of base. Then either apply two thin coats of a sheer milky polish for a slightly built-up canvas, or skip straight to the micro tip if you want the nail to look bare with just the colored edge. Both looks are correct. The sheer base makes the color line easier to see, so beginners often prefer it.
- 04
Load the liner brush correctly
Dip the very tip of the liner brush into your first pastel — no more than a millimeter of the bristles. Then wipe one side of the brush against the bottle neck so the polish sits along a single edge. This is the single most important habit for painting fine lines: a fully loaded brush drips; a one-sided brush glides.
- 05
Draw the first micro line
Hold the brush parallel to the free edge, almost flat against the nail. Start at one corner of the tip and pull the brush across in one confident stroke, following the natural curve of the free edge. Keep the line about two millimeters thick — thinner than you think. If the line is patchy, wait ten seconds and go over it once more. Never scrub with the brush; that thickens the line unpredictably.
- 06
Handle the corners
Corners are where micro French tips fail. Do not try to wrap the color around the side wall — that reads as a mistake. End the line cleanly right at the corner of the tip, and let it stop there. The eye completes the shape on its own.
- 07
Paint the accent fingers in their own colors
Wipe the brush clean with acetone, then load your mint polish and paint the same micro line on both ring fingers. Repeat with peach if you're doing a three-color palette. Working color by color prevents cross-contamination.
- 08
Clean up any overshoot
Dip your cleanup brush in acetone and gently sweep any polish that landed on skin. Clean edges are the difference between amateur and salon.
- 09
Seal with a glossy top coat
One thin layer of glossy top coat over the entire nail, capping the tip. This is essential — without a top coat, the micro line will chip within a day because it sits right at the impact zone of the nail. Wait ten minutes before doing anything with your hands.
"Great nails aren't about perfection — they're about intention. Slow, thin coats always beat a rushed thick one."
Pro Tips
Rest the pinky of your painting hand on a stable surface as you draw the line. A steady hand makes an even line.
Practice one line on a piece of white paper before touching the first nail. Two seconds of muscle memory changes everything.
If the line looks too thin, one more careful pass at the same width looks better than making the line thicker.
Change your top coat every four to six months. Old top coat is thick and yellow and will muddy your pastels.
For a matte finish variation, swap the glossy top coat for a matte top coat. Pastels look incredible matte.
Do the accent fingers first if you're nervous. If they turn out well, the confidence carries into the main color.
Store your liner brush upright, bristle-side up, so it never bends. A bent liner brush is a ruined liner brush.
This design also works beautifully on toes — the micro line reads even cleaner at that scale.
Frequently Asked
How long does a micro French last on natural nails?+
About five to seven days without a refresh, because the color sits right at the impact edge. Reapplying top coat every second day extends it to ten days easily.
What if my hand isn't steady enough for freehand lines?+
Use French-tip vinyl guides. Press one onto the nail, paint above the guide, peel while wet. The results are almost identical.
Can I do this on darker skin?+
Absolutely, and it looks stunning. Warm pastels — peach, butter, terracotta — read especially beautifully on deep skin tones.
Do I need a UV lamp?+
No. Regular polish works. Gel versions last longer and cure instantly, which is convenient for accent fingers.
Which brand of liner brush is worth buying?+
Any beauty supply store liner in size 0 or 00 works. Look for synthetic bristles that come to a fine point when wet. Avoid anything with flared bristles.
Can I mix warm and cool pastels?+
Yes, but stick to two or three shades maximum. Four or more starts to look like a swatch card rather than a manicure.
James Mitchell
Shoots every hand model and product still on the Nailora set. Ten years in commercial beauty photography.


You Might Also Love
Soft Pink French Tips with Gold Foil Accent
A modern twist on the classic French manicure — sheer pink base, ivory tips, and a whisper of gold foil for everyday elegance.
Milky White Glazed Donut Nails at Home
The viral pearl-finish manicure everyone is asking their nail tech for — and how to recreate it in under 30 minutes.
Cherry Red Short Nails: The Classic Look for Every Season
Short nails deserve statement color too. This step-by-step guide gets you a salon-perfect cherry red at home.